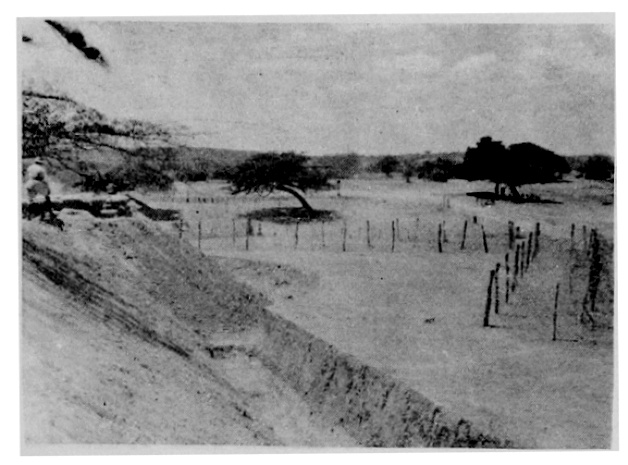
Field fortifications at Gorrahei
.
Two Fat Lardies produced an excellent World War One supplement in their Xmas special in 2014. It contains rules, army lists and a campaign showing how Chain of Command can be used in a First World War setting. Many of these ideas are usable for the interwar timeframe as naturally it was a period of transition between the First and Second World Wars. A number of ideas helped form the rules of the Abyssinian War supplement we have produced for Chain of Command: Abyssinia.
In The Abyssinian War, historically the Ethiopians developed a series of defensive position in their southern theatre referred to as the ‘Hindenburg Line’. These trenches were built under the eye of the Turkish adviser Wahib Pasha, a veteran of the Great War and the field fortifications at Gorrahei prepared by the Ethiopian Chief, Afewark.
The Italians also dug-in similar defences, notably at Neghelli in the southern theatre as well. Often these defensive position were constructed in an all round defensive arrangement to control the access in and out of the town or village and in the expanse of the Ethiopian countryside they proved vital nodal points of control on the limited trails used to connect town centres. This same pattern was seen in the Western Desert in 1940 by the same general – Graziani. It was used with considerable success in Ethiopia and given the situation on the Egyptian border in 1940 one can see method to his deployments…unfortunately for him against quite a different enemy.
In The Abyssinian Crisis such fortifications also appear on the French and British Somaliland borders, pre-dating the real French Somali Maginot line that was built by 1941. Though nothing compared to the defences of the Great War or real Maginot Line, there were nevertheless concentrations of such defences such that at the point of contact the defensive positions reflected something more than just a minor defensive position. Suffice to say, there are numerous opportunities for players to engage in attacks on defensive position in the style of a WW1 attack in The Abyssinian Crisis.
 Therefore, the following rules reflect such improved defensive fortifications using the six scenarios in the main Chain of Command rule book, but with the following amendments to reflect situations where a static defense line is attacked in the style of the Chain of Command scenarios described in their WW1 supplement. All games played on the usual 6’x4′ table.
.
.
The Scenarios
Scenario One – Patrol
This scenario represents the clash of two patrols in No Man ’sLand. No trenches will be present (unless abandoned and largely destroyed). No armour or artillery may be used in this scenario. This scenario may be played across or along the table.
.
Scenario Two – Probe
This scenario represents an attacker probing against forward positions ahead of the front lines. The defender has three squad sized entrenchments which they may place within 24” of their table edge. One sap runs forward from their friendly edge to one of the positions. The attacker has 1D6+6 points of support. The defender has 1D6 points of support. No armour or artillery larger than infantry guns may be used on the table in this scenario. An artillery barrage may be selected by the attacker. This scenario must be played along, not across, the table.
.
Scenario Three – Attack & Defend
The defender has either of the following:
- A stretch of front line trench running across the table up to 24” in from his base line. One communication trench runs forward from their friendly edge to the front line trench.
- Three concrete/earthen bunkers and three wood and sandbagged bunkers with up to 24” of communication trenches between them.
The attacker has 2D6+6 points of support. The defender has 1D6 points of support. Armour and artillery may be present on the table. An artillery barrage may be selected by the attacker. This scenario must be played along, not across, the table.
.
Scenario Four – Delaying Action
The table is either of the following:
- A stretch of front line trench running across the table 24” from the attacker’s base line and a similar stretch of trench running across the table 24” from the defender’s his base line. Two communication trenched connect the two, there being at least 24” apart. A single communication trench runs from the defender’s friendly edge to the nearest trench line.
- One concrete bunkers 24” from the defender’s edge; one concrete bunker and one wood and sandbagged bunker 36” from the same edge; one wood and sandbagged bunker 40” from the same edge. One damaged building will be within 24” of the defender’s table edge.
The attacker has 2D6+6 points of support. The defender has 1D6 points of support. Armour and artillery may be present on the table. An artillery barrage may not be selected by the attacker. This scenario must be played along, not across, the table.
.
Scenario Five – Flank Attack
This scenario represents a breakthrough battle once the initial defensive belt has been penetrated. As such, the defender must place three 12” sections of trenches or squad sized defensive positions based on damaged buildings. A mix, such as two buildings connected by 12” of entrenchments, is allowed. These must be at least 24” from the defender’s table edge.
The attacker has 1D6+6 points of support. The defender has 1D6 points of support. Armour may be present, but no artillery heavier than infantry guns may be present on the table. No artillery barrages may be selected. This scenario must be played along, not across, the table.
.
Scenario Six – Attack on an Objective
This battle represents the final attack on the main objective and, as such, it is behind the enemy main defensive lines.
In addition to the main objective, the defender must place two 12” sections of trenches or squad sized defensive positions based on damaged buildings and one concrete bunker. A mix, such as two buildings connected by 12” of entrenchments, is allowed. These must be at least 24” from the defender’s table edge.
The attacker has 2D6 points of support. The defender has 1D6 points of support. Armour may be present, but no artillery heavier than infantry guns may be present on the table. No artillery barrages may be selected. This scenario must be played along, not across, the table.
.
.
![]()
As an aside, for those wishing to see how some of these WW1 style Chain of Command play out, check out Scrivsland for the many games of WW1 CoC that they have played. Do a search on WW1 and Chain of Command to see the many games played.

Great stuff! Where can I get a copy of your Abyssinian War supplement as well as the Chain of Command: Abyssinia rules? I can’t seem to locate them either here or on Lard Island (I have downloaded all the lists)…
LikeLike
mmm?
I shall update a direct link FROM the TFL page here.
http://toofatlardies.co.uk/forum/viewtopic.php?f=35&t=3225
I have now amended that page to provide a direct link to the entire Abyssinian Crisis Chain of Command lists.
Get them at the foot of the page here
https://abyssiniancrisis.wordpress.com/2015/12/02/chain-of-command-the-abyssinian-war-introduction/
LikeLike
Brilliant! Many thanks!
LikeLike