Chain of Command, Abyssinia May 1939!

Related, but not the same…much to like nevertheless! The following game was put on by ‘Pedivere’ and his group using The Abyssinian Crisis as inspiration for some more ‘what if’s’ in the lead up to the Second World War. Their battle report appears here as a ‘guest post’ on the TAC blog, as any can be if related to the Abyssinian Crisis theme. Their table, I think you will agree, is superb with many interesting details that really bring it life.

In this clash the Italians and French Legionnaires, with Ethiopian Mehal Sefari in support, have at it in a fight over an airfield in the Horn of Africa…

.

Chain of Command, Abyssinia, May 1939

On Friday, our small Chain of Command group once again met for a game in our fictitious setting in Abyssinia (today’s Ethiopia).

Situation – May 1939, Mussolini’s Italy attacked Albania to extend its influence in the Balkans. For Great Britain and France, the limits of appeasement policy have now been reached. In order not to encourage Germany to attack one of its neighbors, France wants to put an end to the fascist taunts.


In Syria, in recent years and months, the French had already contacted larger groups of troops and now decided to attack the Italians in Abyssinia, they who had conquered Abyssinia in 1936, despite protests by the League of Nations.

Together with a platoon of Mehal Sefari, a platoon of French Legionnaires tried to attack an Italian airfield near the strategically important Addis Ababa-Djibouti rail line, consisting of Italian infantry and armored vehicles.

(CoC scenario 3: Attack & Defend).

Overview of the battlefield

.

Warned by their outposts, the Italians are sending out patrols that will soon hit their opponents and get involved in the fighting.

The Jump Off Points for the Legion and Mehal Sefari are placed cleverly in the features near the Italians on their left in the small dip in the ground between the village and the crops.

The Italian JOP’s are in the village in front of the fortress, near the grey corrugated iron huts and the small repair hall.

For the Mehal Sefari this engagement will ‘test their metal’, and accordingly, the commanders will have to motivate their troops to keep them in the fight. They will struggle somewhat to compete with the Italians who are confident in their modern armament and the support of two armored vehicles. (Force morale of the Italians is 10, that of the Regular Legion at 9, the Mehal Sefari at 7).

.

Nevertheless, the motivating speeches do have an effect on the Abyssinians, who resolutely move into the village on the edge of the old unoccupied fort, and take the initiative from the Italians (a roll of 2 sixes means the next phase also belongs to the Mehal Sefari. The Italian JOP in the village is also overrun so the Italians cannot use it).

.

To the south, the platoon of legionnaires is advancing towards the airport, a section tring to reach the opposite hill with its palm trees for cover.

.

The Italian defenders are hastily occupying their prepared positions. In the background, a FIAT 611 comes on at full speed hoping to prepare a bloody reception for the Mehal Sefari.

.

Not to be out done, the Mehal Sefari are now ready in position, and stealing themselves for the fight. One of the two Ethiopian  Half-Platoons tries to exploit the cover of the small valley as much as possible so as to respond to the fire of the Italian infantry as well…clever thinking.

…meanwhile the other Half-Platoon takes the most difficult task, the village, against the fire from the Italian infantry and the attacking FIAT 611.

In order to increase their chances, the Ethiopians have a number of surprises planned. They are supported not only by an advanced 20mm SEMAG cannon (which can at least cause some discomfort to the lightly armored vehicles and tanks of the Italians), but a battle-flag is planted for moral support as well (which prevents a shock point per phase).

In addition the Amsa aleqa (Inferior Senior Leader) is also supported by a British military adviser…the Ethiopians have certainly come to fight!

Though the attacking Abyssinians have suffered some losses they are mitigated somewhat because of the size of their sections, making their accumulated shock hits still manageable.

.

Much to the chagrin of the Italian commander, so far the twin MG of the FIAT 611 has hardly had any impact, lurking behind a truck for cover! And yet, while other Italian armored infantry is moving up in support, the fate of the FIAT 611 is sealed before any infantry support can arrive – a volley of the SEMAG irreparably damages its main armament, which is not so good for Italian morale, and shortly afterwards the Italian Infantry takes flight.

(The lost section, the wounded leader, means the force morale of the Italians drops suddenly from 10 to 6, and the lost JOP in the village).

.

“…good work chaps, that deserves a cup of tea!…”

The infantry had escaped and left their amazed NCO, whilst the other FIAT turned off as it was threatened by a movement of the advancing legion. The Italians try to throw more infantry into the battle via a truck ride, so the Ethiopian and Frenchmen’s work is not done yet.

In addition, two Italian infantry sections once again began moving forward. While one section took up a defensive position, the other section tried to advance into the village in a desperate action to break through the threatening encirclement by the Mehal Sefari and Legionnaires.

However, they are immediately caught in a crossfire by the complete platoon of Mehal Sefari, supported by a MMG team and the SEMAG cannon, which changes quickly from AP to HE ammunition.

With that counter stroke the Italian relief force collapses under immense losses. Only a few Italians get away from the horror as their comrades fall around them.

For the Italian commander there is nothing left to do but issue the order to retreat!

With his front lines collapsed, or no longer held, and as enemy forces begin to close, the advancing section of the legion threatens to cut off the Italian communication line.

The allies decide to await the arrival of more troops to occupy the hard fought positions.

Due to the strategic situation, a decisive counter-attack by the Italians is to be expected within a very short time and thus further battles for both sides…stay tuned!

.

Again, an exciting game in our certainly quite unique setting, which has a really nice interwar (just!) backdrop.

Terrain comes from Pedivere and KingKobra.

Additional pics and articles on all these forces for The Abyssinian Crisis and related topics is well worth checking out…

The  Italians are by @KingCobra. The Abyssinians were painted and converted by Utgaard. A few pictures more can be found as usual on his blog:
http://utgaards-blog.blogspot.de/2017/04…of-command.html

Thanks guys for an excellent battle report, gorgeous looking terrain and interesting interwar theme.

For those that would like to see a bit more of the troops above please follow the links. I can;t emphasise enough how well done these models are – they are very evocative of the period and really show the the forces off in the spirit of the The Abyssinian Crisis. The ‘green coat’ is particularly nice in my view and we hope for more from Pedevire, Utgarrd and KingKobra.

I include a quick selection of eye candy here with the thanks to the guys for letting me host them. Top job!

A superb model of the Ethiopian 20mm SEMAG.

Check out the build post for this weapon…nice work

.

.

An excellent mix of figures – Empress, Copplestone and Perry (head)

.

.

.

Ethiopian Chitet in Chain of Command…a closer look (part V)

P1080893

Ethiopian hazbs on the rocky ground , the Ammist Aleqa and his hazb in the wood with the chitet riflemen in the scrub to the left. The Italians occupy the central scrub area and rocky ground in the top-right corner.

Continuing on with the second and concluding part of the battle report and series of posts discussing the use of the Ethiopian irregular forces in Chain of Command: Abyssinia, the situation is as follows.

Seven phases have passed with no end of turn as yet. The Ethiopians having managed to pull of a coup de main by storming the rocky ground overlooking the main Italian position and stand poised with their (Ammist Aleqa) second in command and last leader positioned in the wood opposite the Italian position.

The Italians are hanging on grimly but are slowly taking a toll on the enemy before them. The Ethiopian player still has one more hazb to deploy just as the Italian player has his tripod mounted machine gun yet to arrive. The Italian player has two pips and the Ethiopian have three pips toward a Chain of Command dice. Italian force morale is 7 and the Ethiopian’s 5, with their commitment level set at Motivated.

…we continue the action…


φ

P1080892

If you recall, this was the last image the Italian section two leader saw when looking through his binoculars…

.

.

.


P1080894

Here we see the situation as it stands with all the key players in view. The Italian player rolls his command dice, and for what is now the eighth phase not a single ‘1’ has been rolled for the introduction of the medium machine gun team….that’s Chain of Command for you! Whilst a junior leader could have been used to deploy the MMG the Italian player has chosen not to do so as he used his ‘3’ command dice to increase the fire of the AR team he was with – probably not a good choice.

On the left the Italian third section opens fire on the hazbs on the hill, the Flag proving a suitable aiming point for the section. The fire is effective causing two casualties and some shock, one being able to be ignored because of the Flag, but it still triggers a fire & combat effect test. Rolling for the hazb the Ethiopian player passes with no effect, aided by his still high motivation. Whilst it seems like these hazbs are invincible, they are taking casualties and unless they move off quickly and advance they are going to take a build up off losses that will reduce their size and hence ability to shake off the effects of fire and ultimately will become Pinned and then combat ineffective.

In the previous phase the third Ethiopian hazb with the Ammist Aleqa moved into position on the edge of the wood but took some incoming fire that caused a couple of casualties. They passed their fire effect test but the Italians are now just starting to assert some fire dominance on their opposition by forcing these checks and whittling them away.

Further to that the following Ethiopian command dice roll is of 1,5,5,6 and thus is largely unusable, though they build up their chain of command dice though not moving forward. The Italian player however rolls a fortuitous back to back score of double 6s and is also able to activate both leaders in each section.

They fire and rolling again straight away…fire!. The combined effect of two phases of fire is useful but still not effective enough…a missed opportunity. With all this firing the Italian player has still to roll a single ‘1’ on his command dice pool to bring on his MMG team! Also, as the team is off-table it’ll have to roll to arrive as the senior leader is on-table…perhaps the Italian defence wasn’t so well laid out after all!

.

.

.


P1080895

Chitet riflemen, still Pinned and doing little else except ‘being there’.

.

.

.

P1080894

The following phase brings yet more inactivity from the Ethiopians but for the Italians they keep the fire pouring on. Section three fires on the hazb on the rocky ground and triggers a fire combat test. The hazb rolls a 1, adding +1drm because they are motivated, luckily raising there result to ‘Pinned’. If they hadn’t had their motivation modifier they would’ve routed! Section two fires at the nearest threat in the woods killing two chitet and causing a fire test which fortunately they pass.

So, with ineffective rifle fire from tribal riflemen, one hazb pinned and the other hazb leaderless with really only one in any position to close rapidly with the Italians the battle would appear to be swinging toward the Italian side. Also, for the small group of broken riflemen (from section one) they no longer have enemy that can easily close with them thereby giving them a temporary reprieve. 

(Design note – even though no leader is with the pinned hazb they can still attempt to remove the pin if they are given a command dice to activate in a phase, as per the CoC-Irregular rules. However, as they have no leader they must abide by the result which could make such a test risky. In this case they have a +1 motivation modifier so it’s not possible for them to rout and they have reasonable chance of success to remove the pin. Nevertheless for the moment they are unable to do anything except try and remove that pin by unit activation and off course must continue to take enemy fire).

.

.

P1080896

Section two squad leader instructs his men to keep up a hot fire and ready themselves for the next Ethiopian assault.

.

.

.

P1080897

Realising that  the momentum of the attack must be maintained the Ammist Aleqa orders an assault. Waving his sword “….attack…” he drives his men forward out of the wood and straight at the Italians in the scrub.

.

.

.

P1080898

…Arrai!, Arrai!…

Unfortunately the move dice roll is insufficient to close within 4″ as they rolled a score causing them to fall short by just 1″…so no close combat!

.

.

.

P1080899

Bracing themselves the Italians have a golden opportunity to deliver some devastating close range fire. The Italian player rolls his dice now hoping to be able to get some really effective fire going. He rolls his dice..6,4,5,5,5!! He gets three chain of command points but can only activate one senior leader…argghh! Whilst he gains a chain of command dice he has lost a chance to really put out some effective fire from section two… they are clearly rattled by the wave of Ethiopians heading their way.

.

.

.

P1080900

“…when do we fire tenente…when?…”


.

.

.

P1080901

In a moment frozen in time, the Italian leader loses his nerve and does not give the order to shoot.

.

.

.

P1080902


.

.

.

P1080903

The Ethiopians now see their chance. The leader, sword in hand,  waves his warriors on into the attack. As he is the only leader left to command he stays out of the combat and forgoes the chance to add extra combat dice but also prevents the chance he will be a casualty…always a high chance in close combat. He needs to bring up the other hazbs so watches on as his men surge into combat.


.

.

.

P1080904

“…fight for your lives!…”

The Italians, now involuntarily open up and fight with rifle butt and bayonet on the enemy, giving them a total combat dice pool of 23 dice. The Ethiopians have a total of 24 combat dice…maybe the leader should’ve attacked after all? Dice are rolled and the Italians score two kills and six shock whilst the Ethiopians respond with a dice roll of  six kills and one shock…butchery!

The Ethiopian shotel (sword) does its deadly work and the Italians lose the combat by ‘four dead’. This is enough to cause an immediate ‘rout’ result with double shock on the Italians….they run though remarkably the junior leader, whilst hit, is only knocked senseless for a phase and survives the attack.

This does however causes a test on the Bad Things Happen table and the Italian force morale drops by a further point but this also results in the Ethiopian motivation level to increase to the Highly Motivated state…they are now fully whipped up into a bloodlust.

.

.P1080905

.

P1080908

The Ethiopians, buoyed by their success overrun the Italian second section position and push through into the cover of the scrubby area now littered with the remains of the shattered Italian position. It’d been a bold and courageous assault that could easily have gone the other way but the chitet prevailed. In the blink of an eye things now look desperate for the Italians. With one bold and decisive charge the situation results in the following outcome.

The Italians have two units broken, the Ethiopians have captured two jump off points, they have built up five chain of command points so that if they can end the Turn with the play of a CoC dice they can force the Italians to check morale for th eloss of two JOPs and two broken units! That would all but see their force morale collapse and the battle end however it would result in the Ethiopian motivation level being returned to Committed, robbing them of the highly motivated state they are in at present….which is to their great advantage in helping pass motivation tests as they now gain a +2drm.

For the Italians, the last phase that robbed them of alot firing potential did however gift them a chain of command dice so they could counter the Ethiopian play of turn play, by using their chain of command dice by keeping the Turn going, though this also keeps the Ethiopian force motivation at its highest  (and most dangerous) level….all pretty desperate stuff.

(Note – It’s worth point out that this decisive outcome in the Ethiopians favour could easily have gone the other way and the Ethiopians could have been forced to retreat with a broken unit, with another pinned and the Italians with two sections still in the fight and most likely a reduction in the Ethiopian force motivation level…so goes the fortunes of war!)

.

.

.

P1080909

Ethiopians surge toward the last Italian position

.

.

.

P1080910

“…run boys, run!…”

In the next phase the Italians, with the Ethiopians breathing down their neck, roll a 5,5,6,3,3. The dice allow a further build up of their second chain of command dice  with the section three junior leader taking control of the Breda team to fire as much as possible.

Unfortunately the section rifle team is still facing off against the enemy to their front as the burst through by the Ethiopians is both immediate and unexpected, thereby not allowing them to reposition to bring their fire to bear. The Breda team open fire but to no effect. The routing men of section two are then engaged by the Ethiopians in their turn and, needless to say, are easily overrun and defeated in combat. This caused the a loss of a Junior leader who is killed outright and the section itself is wiped out.

The Ethiopians occupy the ground of the combat and are now almost within the section three position. The Italian player elects to use a chain of command dice to avoid a force morale check but the other still causes a force morale drop for the leader loss, it now being reduced to force morale four and as a result their command dice pool is now reduced from five to four dice…things look bad for the Italians….but they are hanging tough! The Ethiopians however have a force morale of 5 themselves so if they suffer a bad reverse then things could all come unstuck for them to!

.

.

.

P1080911

“…push on!…”

.

.

.

P1080912

“…don’t stop…attack!…”

.

.

.

P1080913

In the next phase the Italians, with the Ethiopians before them roll a 5,1,4,3. The dice allow a further build up of the chain of command dice, now at 5 pips, but importantly  the tripod machine gun (finally) successfully deploys and the whole section is able to fire, with the platoon senior leader taking control of the Breda team to fire as much as possible and the junior leader ordering long range fire with the rifle team.

The MMG and Breda open fire but they inflict only one kill and two shock though still causing a test on the fire combat table. Rolling a ‘2’ which is modified (+2drm) to a 4 (as the chitet are now in a highly motivated state), they pass the test…they will not be stopped! The Breda team open up but inflict a poultry two shock and causes no test…the Ethiopians surge forward…

.

.

.

P1080914

In the next (Ethiopian) phase the the first hazb remains pinned and the second commences an advance. Note the Ethiopian player could attempt to lift the pinned marker of the first hazb but without a leader present this is risky as the rolled result must be obeyed. However they are highly motivated so there is a good chance they will pass or at least only remain pinned so giving them an activation dice in this situation would be a good idea…the Ethiopian player elected not to give them one this phase however!.

.

.

P1080915

Meanwhile the Ethiopian player, his blood up, launches his devastatingly effective hazb in the final act.

.

.

.

P1080916

Straight at it, they throw themselves at the medium machine gun, overrunning it and in and behind into section three’s defensive position. The fighting is desperate but with their blood lust up the italians roll dismally in combat and the loss of the medium machine gun and a junior leader in section three causes the Italian morale to collapse to zero…the rest of the Italians break and run and is a decisive Ethiopian victory.

Final force morale is Ethiopians 5, Italians 0.

.

P1080918

Italian combat dice…awful…

.

.

.

P1080917

A clean sweep. The Italians are literally driven from the field everywhere!


.

.

.

P1080919

“…Remember Adwa, remember Adwa!…”

.

.

.

P1080921

.

.

.

COMMENTS

A victory and a complete one at that! The Italians in this engagement seemed to fail the test just at the times they needed things to go their way. In reality the game was much closer at a number of points than it perhaps seemed. They desperately needed to get that MMG into action and not deploy gin by th ruse of the junior leader was surely a mistake they paid for.

The opening encounter with the two Ethiopian hazbs able to emerge from and near the cave complex proved to be an excellent support list choice that helped them get a good start. This got their motivation level up and snipped off an enemy jump off points and gained them a potential force morale advantage when the end of turn came.

The emphasis on getting that motivation level up is critical and was clearly illustrated how a number of fire and combat tests were relatively easily passed when this occurred…motivation for irregulars is key!

Even though the game breaking combat against the Italian second section went in favour of the Ethiopians, in reality this was gamble. It was an even dice fight (23 vs 24 combat dice) and it is entirely possible the Italians could have held and then started to gain a proper fire ascendancy over the Ethiopians. The only riposte they had would’ve been their fairly weak tribal rifles unit which didn’t do alot in the end. So what looked like an easy Ethiopian win was in fact a fairly close run thing.

Even the force morale for the Ethiopians was a little touch and go. They only needed to lose two more force morale potions to be unable to win the scenario victory conditions so they did quite well to limit their loss to only 3 points, granted they stated the game with low force morale due to a poor die roll. As they only had two leaders this limited their potential for losing alot of force morale points which is a good thing anyway. It also means command and control suffers was well….so finding way to get around this by using the Flag was a smart support list choice.

.

So there you go, an emphatic Ethiopian victory with little more than sword and spear armed troops who made best use of their limited command ability and maximised their inherent advantages of speed, surprise spear and sword…

Ethiopian Chitet in Chain of Command…a closer look (part IV)

P1080873

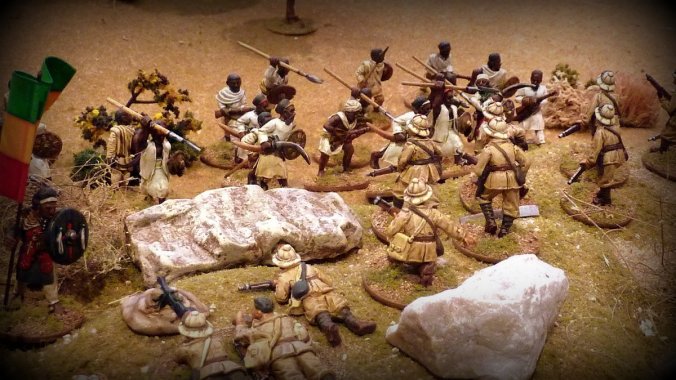
“…they emerged from caves, we barely saw them before the glint of steel with howling screams filled the air. Blood and steal mixed in a maelstrom of fury atop the hill. It was a desperate struggle and the squad leader, Caporal Giuseppe, fell leading his men along with many others in the desperate struggle. For us, all was lost, mercifully a few of us got away to tell the tale…”

…Fucilieri Antonino Brazingo, at the action of Mai Timchet, December 15, 1935

ψ

The past three posts we’ve discussed numerous options and ideas about fielding an Ethiopian Chitet force, specifically focusing on the many unique aspects when using this force in Chain of Command: Abyssinia.  In this post we look at some of these principles in action with an engagement between an Ethiopian Chitet force and an Italian Fucilieri platoon.


Situation

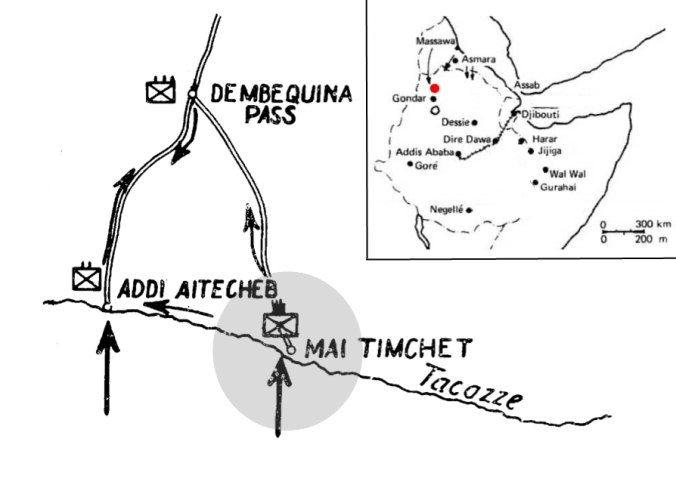
It is December 1935 and on the northern front the Italians have steadily been advancing meeting only localised Ethiopian resistance. In the opening operations of the Ethiopian Christmas Offensive a sharp engagement occurred on the banks of the Tacazze River near Mai Timchet. Elements of the Italian II corps are engaged by the forces of Ras Imru.
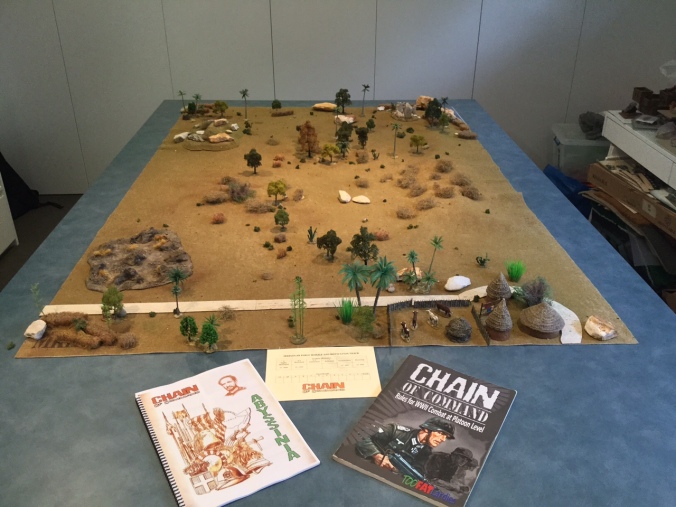
AAR map #1 2

Game Set up

Forces

We shall play Chain of Command Scenario Three: Attack & Defend to reflect the offensive movement of Ras Imru’s chitet across the Tacazze. We’ll assume the baluch has crossed the river and is now moving on a small outpost leading into the town of Mai Timchet. In this scenario we’ll take a standard Italian platoon and the Chitet shall represent a force relying on relatively large but poorly commanded hazbs (sections) as discussed in the previous post.

These two platoons against one another provides an initial Platoon Force Rating split of (-1 to +3) i.e. four points in favour of the Ethiopians. In the subsequent roll for additional support forces the Ethiopian player scores an 8 giving him a final total of 12 support points to spend (8+4=12). The Italians gain 4 support lists points (i.e. half of the dice score rolled by the Ethiopian player).

Italian Forces

A typical Italian platoon using the Regno Esercito and CCNN army list is made up as follows;

Platoon Force Rating; Regular +3 – Command Dice 5
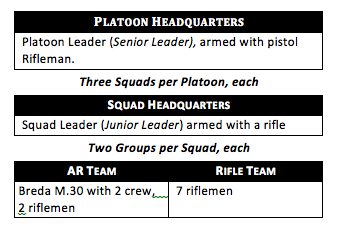
Screen Shot 2016-01-21 at 7.23.45 am

  • Special Rules: None
  • Support list choices; 4 support list points.
    •  MMG on tripod with 4 crew = 4 SL


Ethiopian Forces

Platoon Force Rating; Regular -1 – Command Dice 4

Screen Shot 2016-01-21 at 7.35.27 am

  • Special Rules: Aggressive and Sons of Adwa
  • Support list choices; 12 support list points.
    • Flag = 2 SL
    • Cave = 2SL
    • Tribal Rifles = 1 SL
    • Additional Men = 7 selections (i.e. 7×5=35 men) = 7 SL

The Gascegna shall be divided up as follows;

  • 1st hazb – 20men
  • 2nd hazb – 20men
  • 3rd hazb – 20men
  • 4th hazb – 15men (ten with tribal rifles)
  • 5th hazb – 10 men


Notes – The Italian player has chosen to use a MMG to bolster his defensive position – his only support list choice but he should have plenty of targets! The Ethiopian Chitet player  has gone for a fairly large but cumbersome force….men, men and more men! It incorporates some firepower but predominately is a close combat force, the very essence of a warrior culture. The intent will be to overwhelm the Italian defenders by using the Flag command to issue orders to provide principle command and control in a simple but effective way, which will off course be limited as there are only four command dice available…we shall see how it goes! 


IMG_4760

.

Irregular rules to take note of;

Just before we leap into the action it’d be prudent to just touch on some of the more important aspects of the irregular troop rules in Chain of Command:Abyssinia to refresh our memory. If you’re going to command tribals you need to be familiar with how they work, just as you’d need to know the vehicle rules if you were running an armoured car or tank. So, here are a few quick reminders;

  • Unit Size – remember to keep track of the number of figures in a unit as the size of a unit at any specific moment is what matters, not what size it started at.
  • Movement – 3d6″, no shock….run as much as you like.
  • Motivation – units are in one of six possible motivation states as shown on the motivation record track. If it’s high you get combat bonuses and modifiers to pass fire & combat effect tests. If it’s low the opposite is true.
  • Chain of Command dice – if you get one save it so you may influence when the Turn ends (by forcing a Turn end or preventing it) which will likely impact on your motivation; remember, motivation returns to the ‘neutral’ Committed state when the Turn ends…always.
  • Leaders – a leader can attempt to lift off a pin marker anytime he expends 1 command initiative in a phase by a score of 6 on one D6 per CI spent.
  • Pins – units can attempt to lift of their own pin markers if activated in a phase. However they must follow the result, unless they have an attached leader, who counters any negative test attempt….a benefit of having a leader attached, whether activated or not.

That more or less covers off on the main points for Irregular troops. Also note that your support list choices can influence the irregular rules, for example, your Flag allows you to ignore a shock hit and War Drums gives you a +1 bonus on fire and combat tests, and so on. All these factors should be part of your initial thinking when putting your force together….if you turn up unprepared you may miss an important rule that can help you! Ok, onto the patrol phase…

.

.

Patrol Phase

The patrol phase played out as follows.

As the attacker the Ethiopian player rolls 1D6 to determine his ‘free’ patrol marker movements before the game starts. He scores a ‘3’ giving him three free moves before the patrol phase begins proper. These free moves combined with the Chitet Infiltration ability allows the Ethiopian player to move his patrol markers 14″ instead of the usual 12″ thereby gaining an excellent starting advantage at this stage of the game.

Force Morale is now rolled for both sides. The Italian player rolls a ‘3’ giving him a starting force morale of 9 and the Ethiopian player rolls a 1 giving him a not so good starting force morale of 8. Finally the Ethiopian Motivation Level needs to be set. The Ethiopian player rolls a 4, adding +1 to the the die for the ‘Sons of Adwa‘ trait, resulting in the chitet final score of ‘5’ that being ‘Motiviated’. This will help them pass irregular morale tests (+1drm) and give them some sting in combat (+2D6).

P1080861

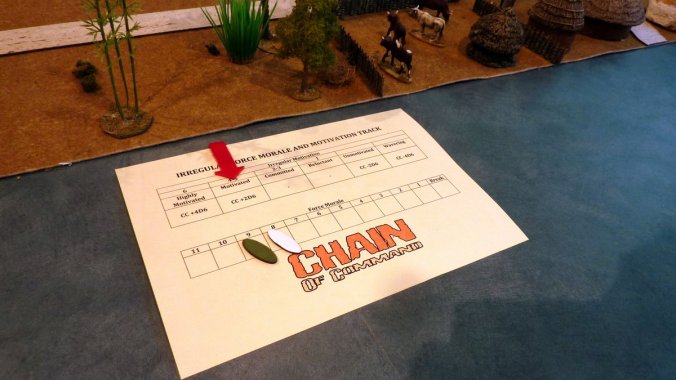
Ethiopian force morale at ‘8’ and their enthusiasm is set at ‘Motivated’. Italian force morale is 9.

SCENARIO OBJECTIVE: To win a victory, one side must force his opponent to withdraw from the table, either voluntarily or due to a reduction in his Force Morale, whilst keeping his own Force Morale at 3 or greater. If neither side achieves this, both will withdraw, neither gaining control of no‐man’s‐land, the result being a dishonourable draw.


.

.

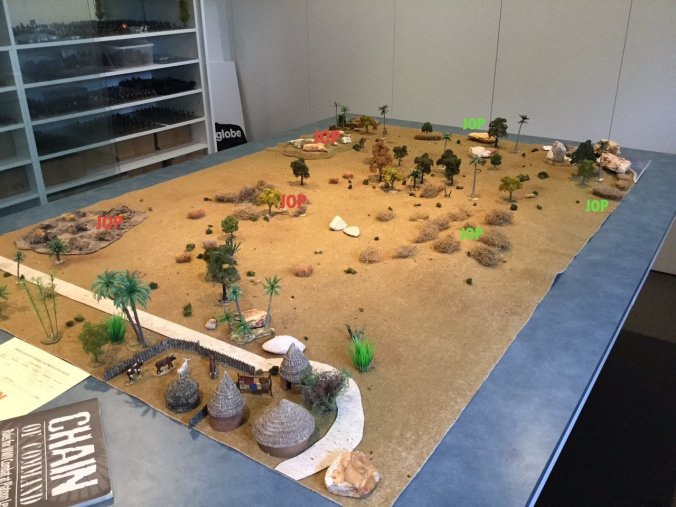
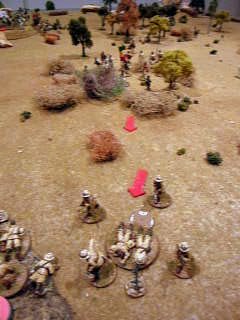
The beginning of the patrol phase had the the initial markers placed as so;

P1080857


.

.

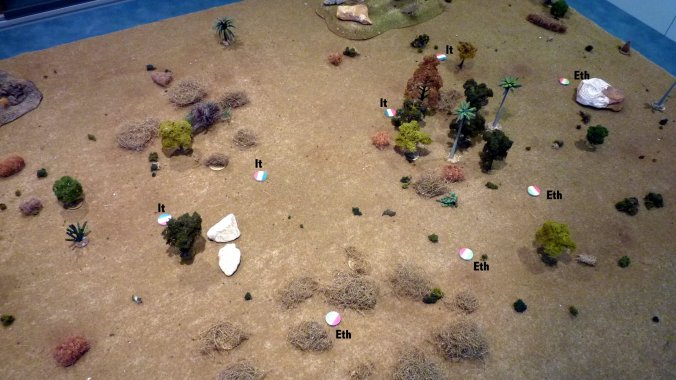
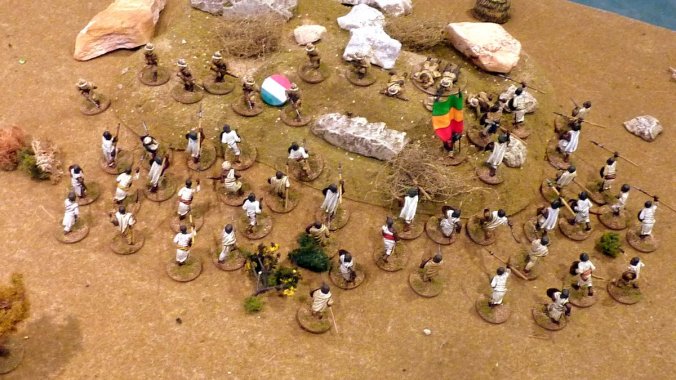
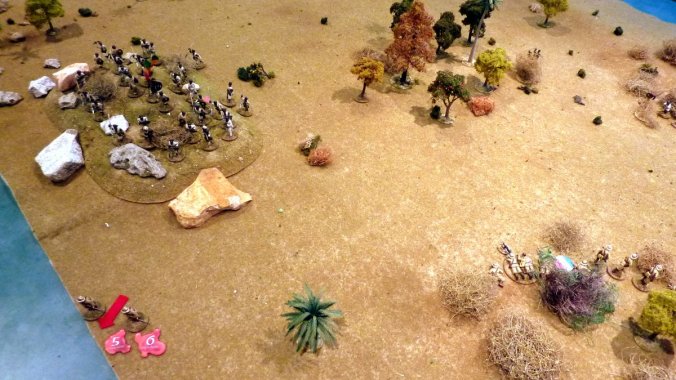
At the conclusion of the Patrol Phase Jump off points are indicated as follows.

IMG_4761


The Italians made the most of the patrol phase by moving (first) as they had the higher force morale. They advanced with the idea of moving forward quickly to ‘lock down’ the chitet patrol markers to minimise their patrol phase ‘infiltration’ advantage. The Italian player must always be mindful of the greater scouting and patrolling ability (i.e. Infiltration) of the Ethiopian player and in this game the Italians correctly realised that limiting enemy movement potential to undermine their battle plan right from the start would be a good idea. To a degree they achieved this.

The Ethiopian player ends up with two JOPs  in useful positions with the third on his baseline offering him less advantage. The JOP on the short table edge however was a very useful location as when coupled with the Cave attribute it essentially enables a kind of ‘mass ambush’ potential to the chitet force.

.

P1080858

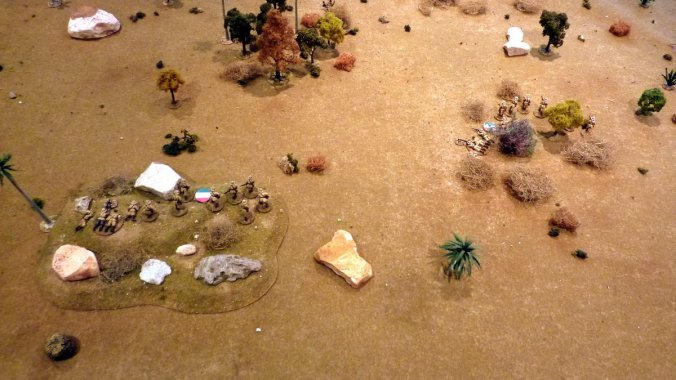
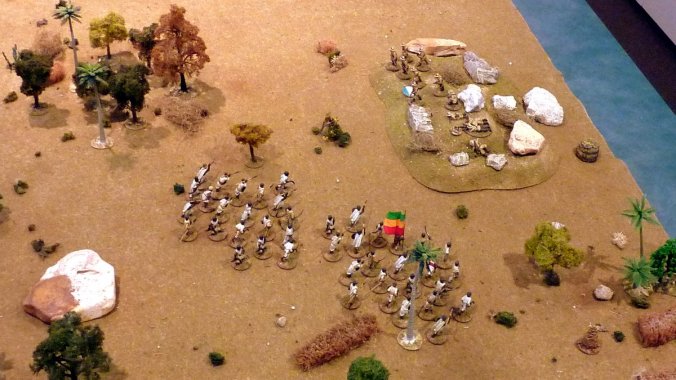
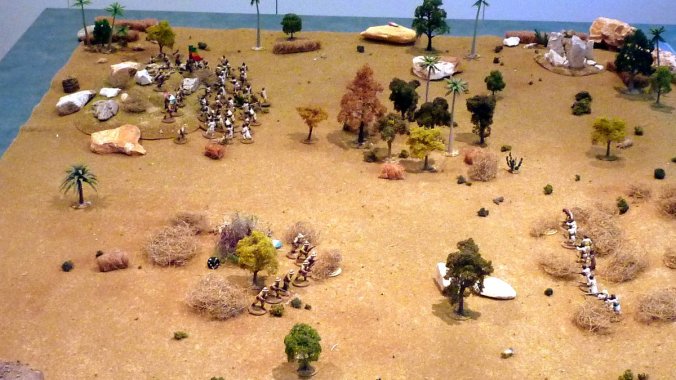
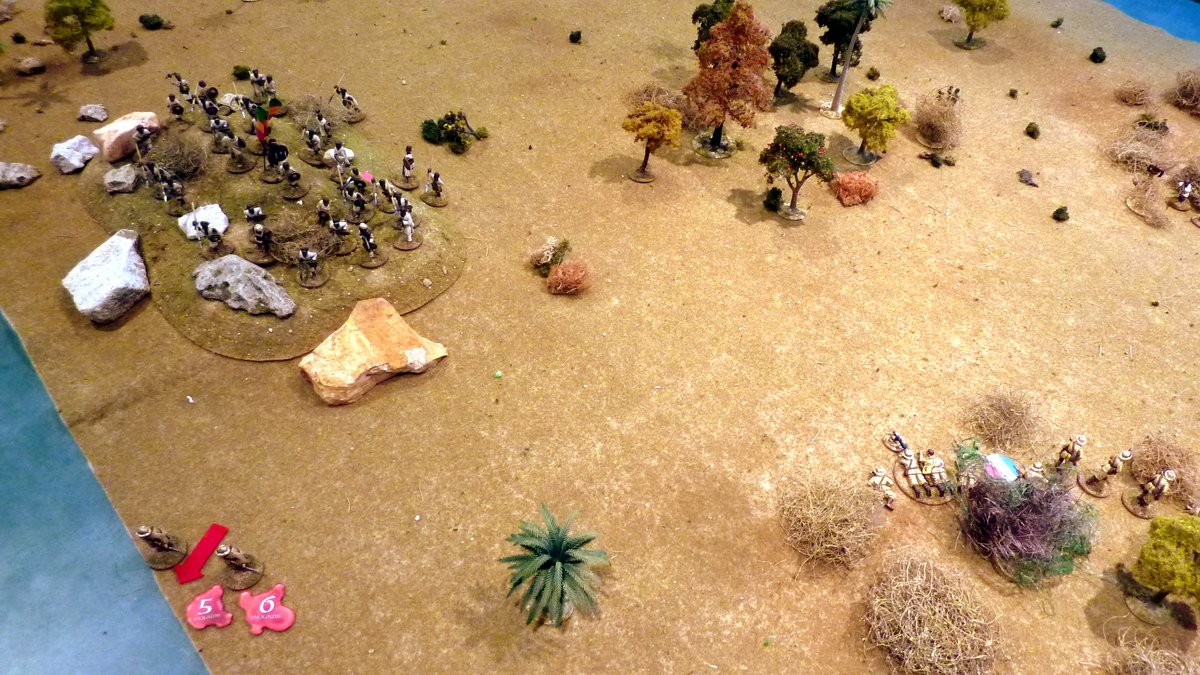
In this overview you can see three Ethiopian JOPs and two Italian ones on the rocky outcrop and scrubby cover.

.

.

.

Combat!

P1080859

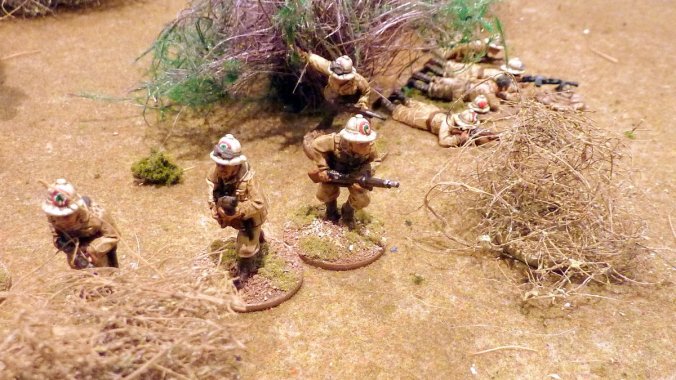
Sections one and two deployed and ready for action

The Italians start the action by immediately deploying troops into their defensive positions. They place a section on the rocky outcrop and another in scrub, both  providing  good fields of fire and light cover for the impending Ethiopian attack. Their plan was to use the ground as much as they could and be able to interdict any Ethiopian move to grab any of their JOPS by fire dominance alone, as each JOP was isolated from the other.

.

.

.

P1080860

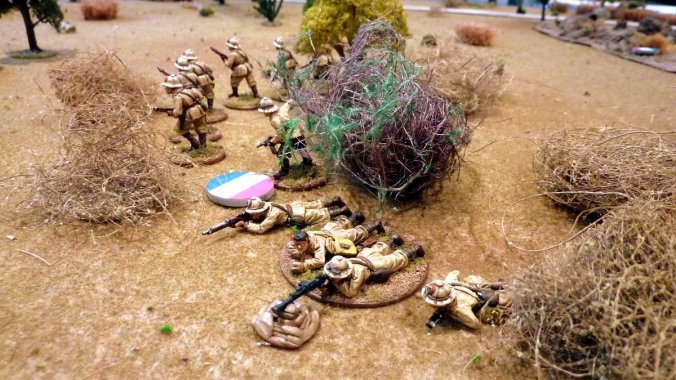
Typical Italian section – rifle section covers to the right, the Breda team the left,  with the section leader placed to control their fire.

An Italian section in the centre of the field was used to cover any front or flank movements by the Ethiopians. As the Ethiopians can move 3D6″ and with no shock effects rapid movement by the enemy can be expected so good fields of fire are important when establishing a defensive position.

.

.

.

P1080862

Attack!!!

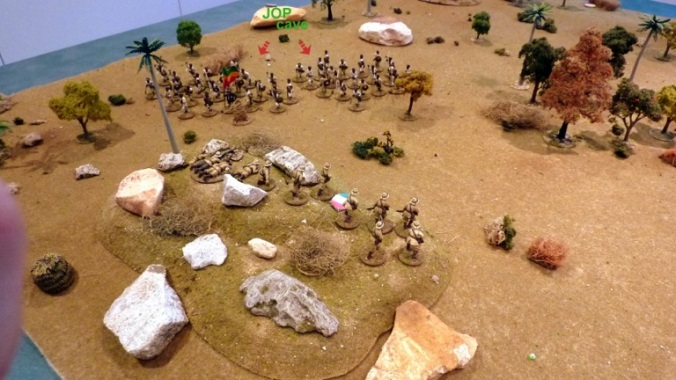
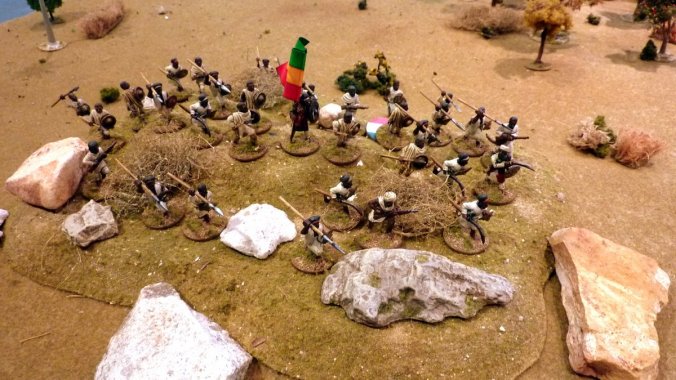
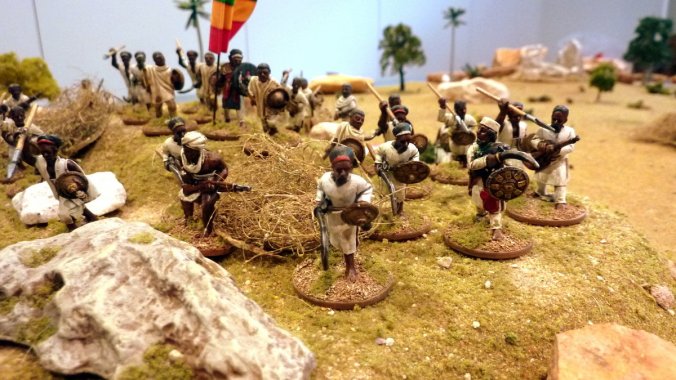
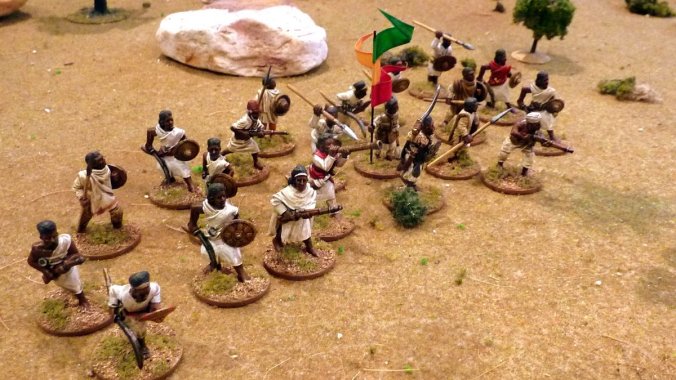
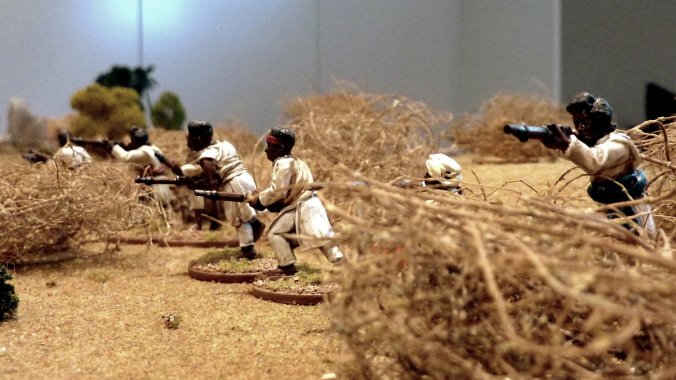
The opening Ethiopian phase saw them deploy as fast as possible. Only rolling four dice they nevertheless scored quite well getting both a Senior leader score ‘4’ and two ‘2s’ enabling two units to deploy…very well planned! Both units emerge from the JOP, one designated as their ‘Cave‘ which  combined with their Infiltration trait that enables a 9″ deployment distance from their JOP with an additional 6″ of movement for this unit, thus they’re able to rapidly emerge in front of the Italian position near the rocky ground.

In addition the Amsa Aleqa senior leader deploys with this group of warriors with one hazb also including the Flag. Clearly this is the major ‘push’ planned by the Ethiopian commander to capture a Italain JOP immediately to gain a quick success and hope to increase his force’s motivation level.

This was clearly going to be an ‘overrun operation’ not an ‘prepared assault’ and he planned on using their size and speed to every advantage. By getting as many troops on table as fast possible the Ethiopians hope to intimidate the Italians and present him with multiple targets to disperse his firepower.

(Note – another option, not used here, that is a hugely useful ability is to redeploy a JOP if you are able to deploy before your opponent gets troops down i.e. you start the game with a higher force morale or he neglects to introduce troops immediately to cover vulnerable JOPs. This trait can shift a JOP to within 12″ of an enemy JOP and then have one or more units deploy 9″ from it…this alone could enable a unit to compromise an enemy JOP from the very first phase…those irregulars really can just appear!).

.

.

.

P1080863

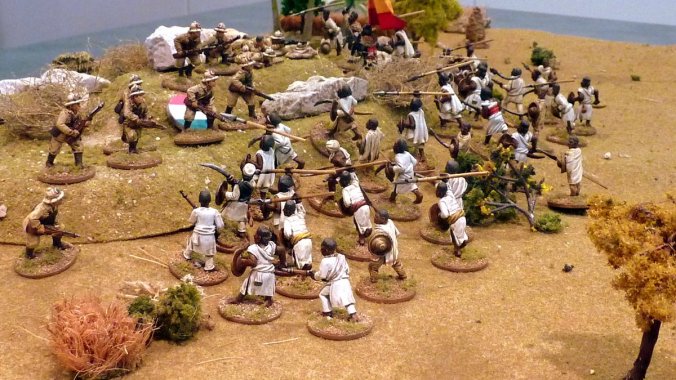
Close up of the chitet emerging from their ‘caves’.

.

.

.

P1080864

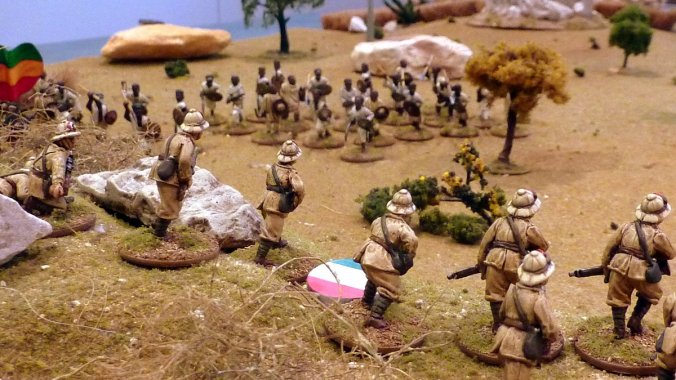
“…Steady men, prepare to fire…fire!…”

The squad leader immediately gives the order to shoot! The squad erupts in a cacophony of rifle fire and spluttering Breda fire all to no avail as the fire effect, whilst causing some shock, was not enough to trigger a morale test on one hazb, whilst the other passed its fire combat check due to its motivation level being unite good (+1drm). In addition the Flag enabled one of the shock to be ignored and this alone meant the first hazb fire effect test was not required.

.

.

.

P1080865

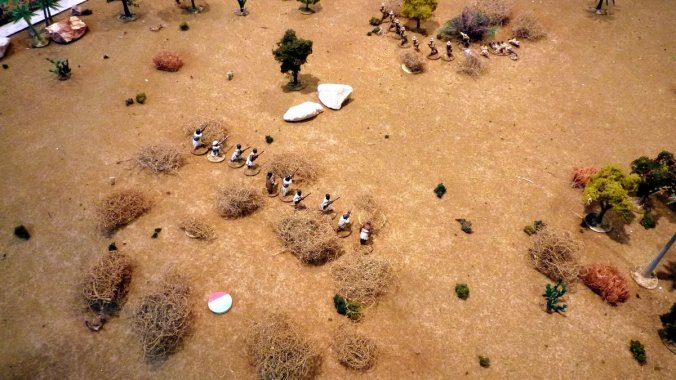
Here you can see just how quickly the chitet can ‘move up’ on an opponent by their infiltration ability, enhanced with their cave support list option.

.

.

.

.

P1080866

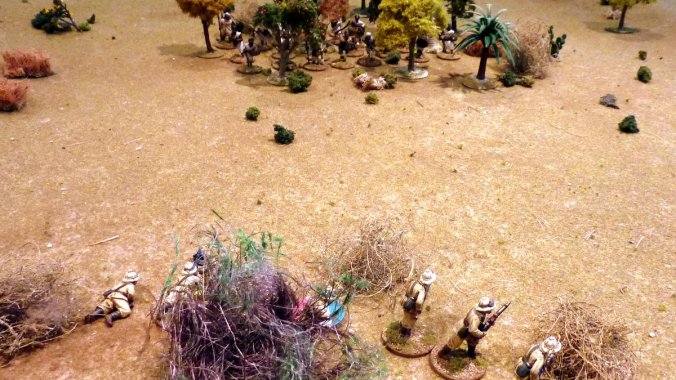
In the following Ethiopian phase chitet forces now started to appear from a different direction to further complicate the Italian defence. The activation dice enabled a unit of riflemen to deploy on the opposite flank to bring down harassing fire and split the Italian commander’s attention…enemy to the front and flank with one position close to be under immediate attack!

.

.

.

P1080867

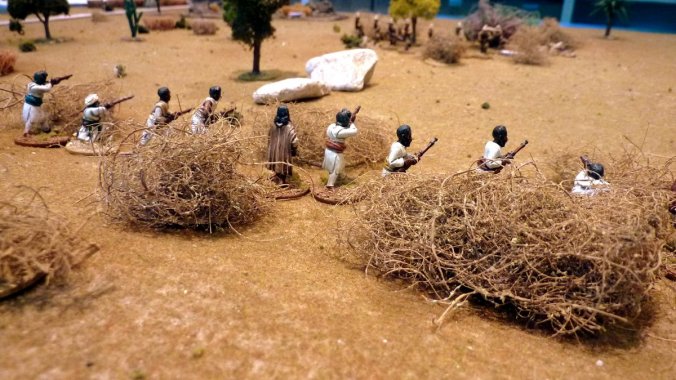
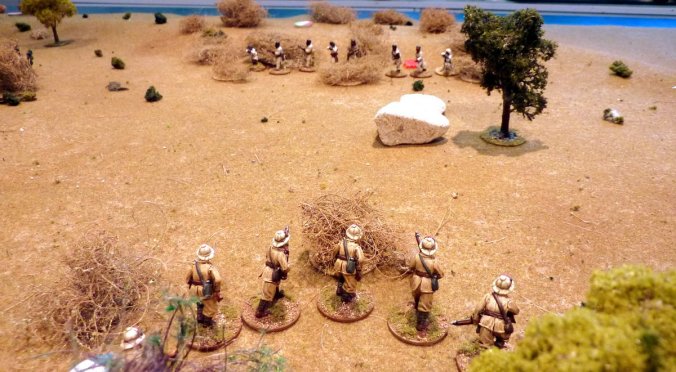
“…shoot, fire…faster, faster…”

The  chitet riflemen, all armed with tribal rifles, cause no result on the Italian squad to their front when they emerge from their JOP in the scrub.

.

.

.

P1080868

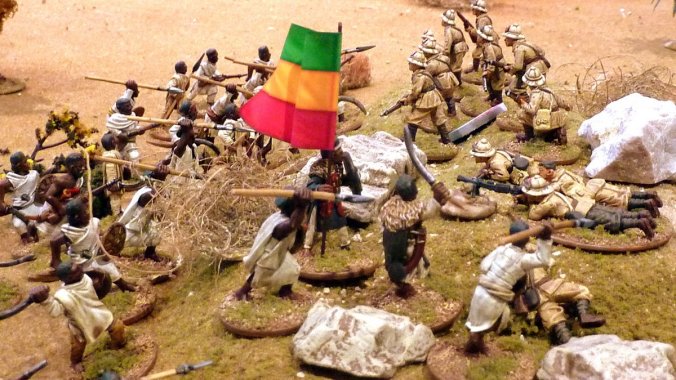
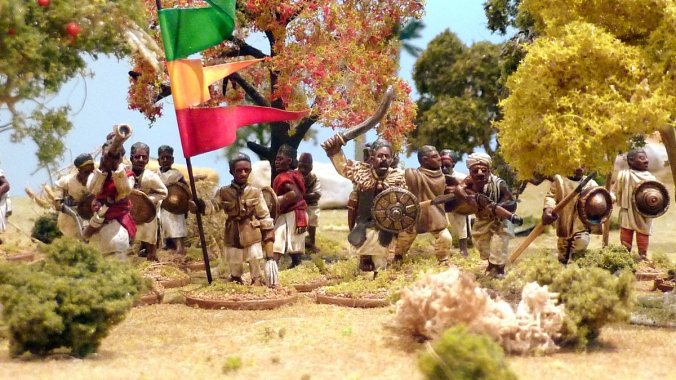
“…death to the invader…”

In the same phase the command dice enables the Amsa Aleqa (SL)  to be activated and a Chain of Command dice to be increased. He immediately issues a command by Flag! With the appropriate flag waving signalling the attack (by using two of his command initiatives) both hazbs were able to move on this order to immediately assault the Italian position…combat in the second phase!

(The ability of the Flag command to issue multiple unit commands can be seen here as only the senior leader need be activated on the command dice…a reasonably achievable result even with only four command dice).

.

.

.


P1080869

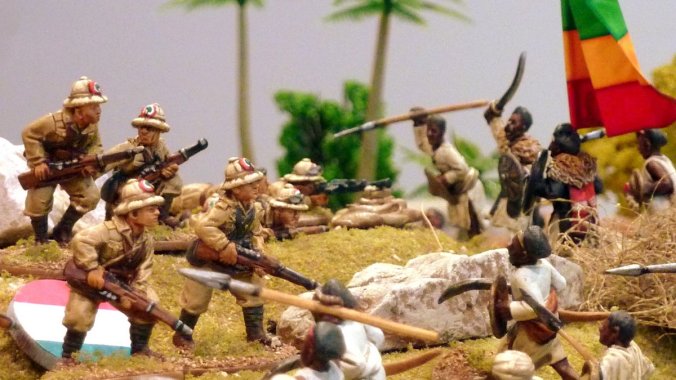
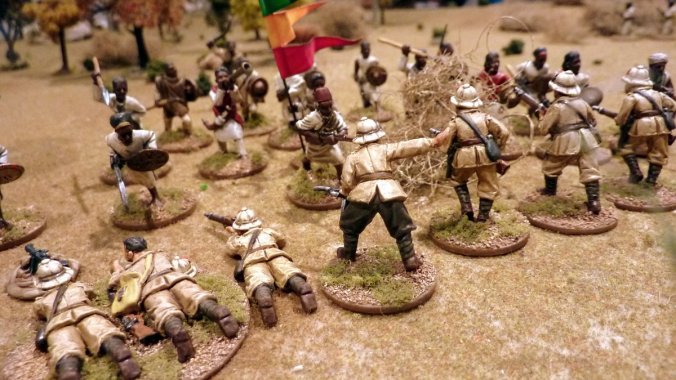
With every man ready for the fight the shear terror of the massed assault by the Ethiopians struck fear into the hearts of the fucilieri. They opened up with a final defensive fire as the combat unfolds.

.

.

.

P1080870

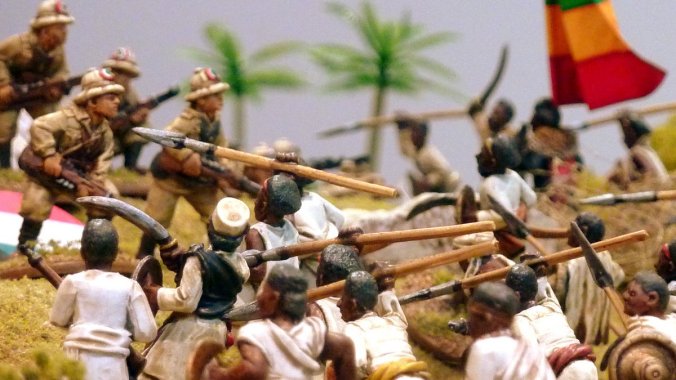
With every bullet expanded there simply isn’t enough time to deliver the requisite volume of effective fire to stop the human wave assault. Virtually cut down to a man, they lose ten of the twelve man section including their junior leader who is killed outright…a huge blow for the Italian player in the opening stage of the game.

The Italians are nothing if not tough and they dish out nine kills of their own on the chitet before they finally fall. Even though the Ethiopians take loses , their victory in combat negates the need to check for a combat effect as the euphoria of victory surges within them.

(To give you some idea of the weight of this attack, the Ethiopian player rolled 60!…yes 60 combat dice to the Italians 24 or so. It is worth pointing out the chain of command rule on p59… “When one side is sending multiple Teams or Sections into a Close Combat in the same Phase, they may choose whether these are sent in to fight simultaneously or one at a time.” This clearly works to the advantage of large irregular forces than can overwhelm isolated enemy positions – take note!)

.

.

.

P1080872

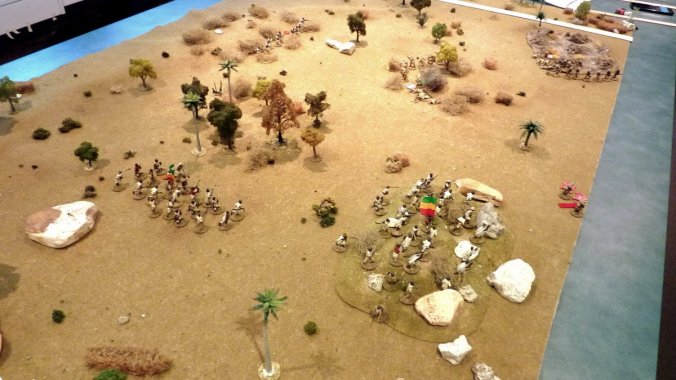
A good view of the chitet riflemen engaging the central fucilieri section as the other two hazbs under the Amsa Aleqa storm the rocky outcrop taking it at sword and spear point.

.

.

.

P1080873

.

.

.

P1080874

The attack however is not without its implications for the Ethiopian player. The Amsa Aleqa, leading from the front, foolishly one might say, falls in the combat (he rolled a ‘1’ on the wound table) and was killed out right. In addition the Flag bearer is also wounded and reduces its ability to command (i.e. issue orders) by one in the same manner as a leader that loses a command initiative when wounded. This however will mean little as the only senior leader in the Ethiopian force is gone and no further Flag commands may be issued!

This will have an immediate command and control effect on the chitet as their main means of communication is now gone (the senior leader/flag combination) and they will have to rely on straight command dice rolls to activate the remaining forces. Whilst the Ethiopians can be content with the victory they have achieved early on they now may struggle to move forward and with no real firepower ability the Italians can continually dish out ranged fire. Things don’t look quite so good now!

With the victory the Ethiopian motivation level would increase as the Italians lost one force morale point on the Bad Things Happen table for losing a Team wiped out and another two points of force morale for their junior leader being killed. However the loss of their own leader and the wounding of their Flag bearer results in a decrease of their motivation as they lose three force morale points, so their is no net change in the chitet motivation level. Note the large loss of force morale points for the chitet as the loss of leaders effect Ethiopian morale quite significantly.  Thus the current Force Morale tally is Italians 7 and the Ethiopians 5. So even though the Ethiopians have had a good measure of success their force morale has taken a blow.

.

P1080876

Seeing the fate of the comrades on the rocky slope, section two fuclieri look on with trepidation at the enemy in the distance.

.

.

.

P1080877

The Italians hang on grimly fighting hard but to no avail.

.

.

.

P1080878

…the posiiton is taken, enemy jump-off point no longer in Italian hands..

.

.

.

P1080879

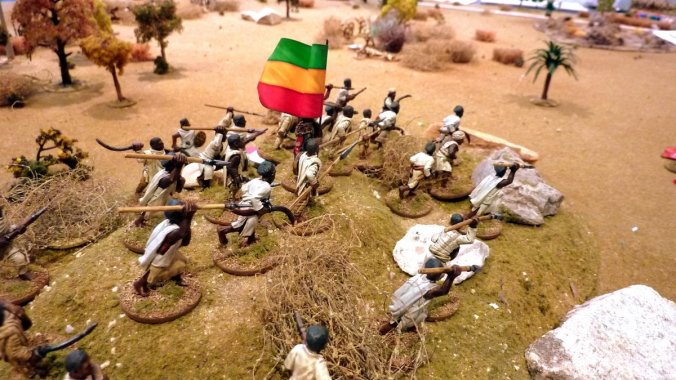
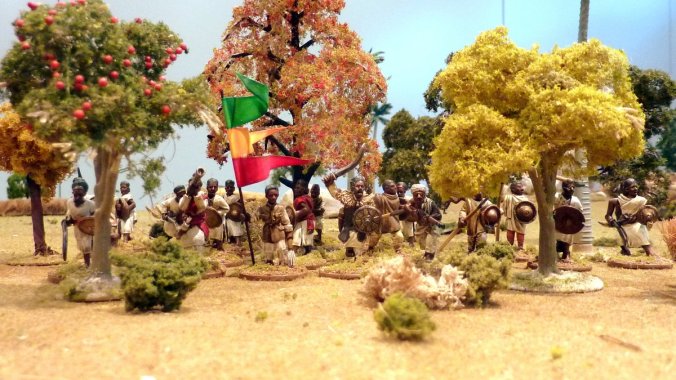
The chitet consolidate their win, though their leader has fallen.

.

.

.

P1080882

.

.

.

P1080880

The retreat of the remaining two men of the section is seen here. They rout taking no further part in the action. They have no leader to rally them and are certain to perish should the chitet attack them.

.

.

.

P1080884

Third Italian section deployed in lower left hand corner in the rocky ground.

With all this Ethiopian activity one could think that the Italian commander was doing nothing at all. However it was but the first few phases and his firepower had not been able to slow the massed assault of the Ethiopian ‘ambush attack’ from their ‘cave complex’. This was a case where the patrol phase had a direct impact on the immediate outcome of the opening phases of the game.

Realising that things were hopeless he needed to get as many of his troops on table as fast as possible whilst also putting out as much firepower as he could. To that end he deployed his third section on table and the senior leader all but completing his deployment barring the FIAT medium machine gun which was needed now more than ever.

A well as gaining a couple of Chain of Command pips he is able to activate the squad leader in section two and the rifle team opens fire on the chitet riflemen opposite their position. The rifle fire is quite effective and the chitet, realising popping up to fire is not such a good idea take, take one casualty and several shock as well. The subsequent fire result test causes them to become Pinned in the scrubby ground.

P1080885

Accurate rifle fire causes the chitet riflemen in the scrub to go to ground ‘Pinned’.

.

.

.

.

P1080886

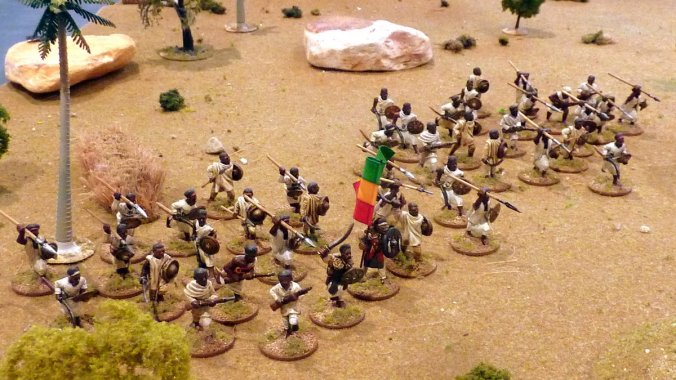
Ammist Aleqa arrives with hazb seen on left

The next Ethiopian phase introduces the  remaining leader into the fray, the second in command, the Ammist Aleqa (superior junior leader). He comes on with a single hazb making for the small wooded area in the centre of the table. Whilst rolling a ‘2’ the Ethiopian player elects not to move forward into the open, waiting for the third hazb to position itself in the small wood before launching something of a co-ordinated attack. As the baluch senior leader is dead all command responsibilities fall to him!

.

.

.

P1080887

…and in close up…

.

.

.

P1080890

Pushing on the Ammist Aleqa and his hazb enter the treeline opposite the centrally placed section two of the Italians platoon, poised for action. The section commander, looking through his binoculars gets a closer look at the new enemy force before him.

.

.

.

P1080891

…here they come…

.

.

P1080892

…and closer again…

.

.

φ

So with that we shall end the first of this two part battle report. Up to this point there have been five-six phases and no end of turn as yet.

As things stand the Ethiopians have managed to pull of a coup de main by storming the rocky ground overlooking the main Italian position….virtually an ambush. Their riflemen have put out some desultory fire for no major effect and the second in command and last leader has now pushed forward to see if he can drive off the Italians and overrun their position. The main strike force has stalled and things, whilst initially looking quite good, have broken down somewhat and the Italians are slowly taking a toll on the enemy before them.

The Ethiopians still have one more hazb to deploy just as the Italian tripod mounted machine gun is yet to arrive also. The Italian player has two Chain of Command pips and the Ethiopian have three pips toward a Chain of Command dice. Italian force morale is 7 and the Ethiopian’s 5, with their commitment level set at Motivated.

..can the Italians hang on or will Ethiopian weight of numbers prove too much?